Skip to main content
Search
Search This Blog
Sizzle and Spoon
Home
More…
Posts
Showing posts from July, 2024
Show all
July 31, 2024
10 ways to add bottle gourd to your lunch...
July 30, 2024
Cutlery set..
July 29, 2024
Small kitchen table sets...
July 29, 2024
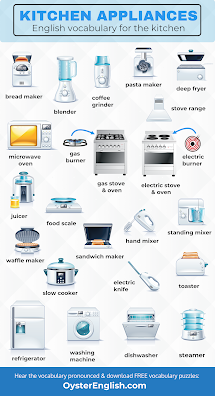
Kitchen tools...
July 29, 2024
Mango dessert...
July 28, 2024
Red velvet cake mix cookies...
July 27, 2024
Black Forest cake recipe..
July 26, 2024
10 fruit salads to enjoy throughout the year..
July 26, 2024
Sausage pasta..
July 25, 2024
Kitchen decor ideas..
July 25, 2024
Healthy breakfast ideas..
July 24, 2024
Kitchen design
July 24, 2024
How to clean stove..
July 23, 2024
How to cook chicken fajita in stove..
July 23, 2024
Cooking, it's presentation and improving techniques..
Newer Posts
Home